Winter Tags With Embossing By Diana Soling

Hi everyone! Diana here with two fun wintery tags using two different embossing techniques using Rinea foiled paper and Crackbox & Suzy stamps.

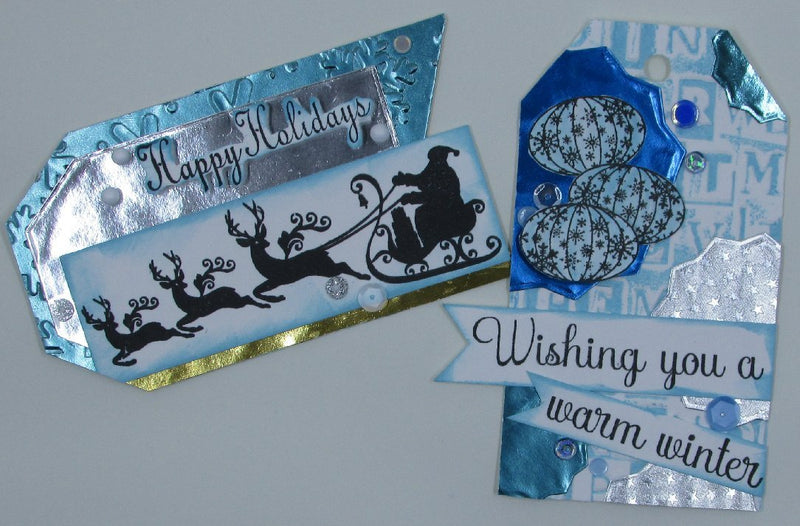
I started my projects by laying all of my Crackerbox & Suzy stamps onto my misti stamping tool and stamping them all in black ink.
For the first tag I added blue ink to the inside top of the embossing folder, slipped in my white cardstock tag base, and ran it through my die cut machine.

This added some amazing texture to my tag and the ink is so easy to wash off. Just use water or a baby wipe.

I then cut out three different size shaped from my foiled paper and adhered them using liquid glue to the base of my tags.

Once they were dried I cut the edges off and used these extra pieces on other areas of my tag.

I then started adding my images and sentiment to finish it off. I took the light blue ink around the edges to soften them up and added sequins for some bling.

For my second tag I embossed the turquoise/gold foiled paper with a snowflake embossing folder. I then turned over the embossed paper and adhered my white cardstock tag to the back. Once it was dry I cut around the tag. (sorry this one is a bit blurry)

I then turned it over and added the gold strip from the bottom to the front of the tag adding a silver/gold die cut tag over it.

This is when I started decorating it with my stamped image and sentiment. I wanted the santa to be the focal image so I fussy cut around my sentiment to make it smaller. I used the light blue ink, again, around the edges.

I finished it off with some fun sequins and snowball embellishments.
Supplies:
Rinea: Frosted Variety foiled paper pack
Crackerbox & Suzy: wishing you a, warm winter wishing, happy holidays, santa's sleigh, lantern snowflake sm
Altenew: permanent black ink, soda top nesting dies, terrific tags dies
Catherine Pooler, it's a boy ink & glacier bay sequins
MISC: white cardstock, snowball embellishments, snowflake & Christmas word embossing folders